
The most common approach to being eco-friendly—recycling—is actually the least effective and most expensive way to manage your household resources.
- True savings come from prioritizing repair, reuse, and repurposing, which preserves an item’s built-in value.
- Recycling often degrades materials (downcycling) and consumes significant energy, representing a net loss of resources.
Recommendation: Shift your mindset from “waste management” to “asset management.” Before you recycle, ask how you can extend the life, repair, or monetize the item first.
For most families, the overflowing recycling bin feels like a weekly victory—a tangible sign of doing the right thing. We diligently separate plastics, paper, and glass, believing we’re at the forefront of sustainability. But what if this ritual, while well-intentioned, is masking a much larger financial leak in our homes? What if we’re focused on the finish line, completely ignoring the race itself?
The common advice revolves around better sorting and buying “recyclable” products. Yet, this approach still treats valuable items as disposable. The real paradigm shift of a circular economy isn’t about getting better at throwing things away; it’s about eliminating the concept of “away” altogether. It’s about seeing that broken toaster not as garbage, but as a collection of valuable components. It’s about viewing that out-of-style jacket not as clutter, but as a cash asset waiting to be sold.
This guide offers a different perspective, one borrowed from a sustainability consultant’s playbook. We will dismantle the myth that recycling is the primary goal. Instead, you’ll learn to adopt a system of `Refuse, Reduce, Reuse, Repair, and Repurpose` that turns your home into a small, efficient economic ecosystem. By treating everything you own as an asset, you stop managing trash and start building wealth.
This article provides a structured path to re-evaluate your household’s resource flow, from questioning recycling’s true role to mastering the art of asset preservation and monetization. The following sections will guide you through this new economic mindset.
Summary: From Waste Management to Home Asset Management
- Why Recycling Should Be Your Last Resort, Not Your First?
- How to Diagnose and Fix Small Appliances Before Buying New?
- Compostable vs Biodegradable: Which Plastic Alternative Actually Breaks Down?
- The Fridge Organization Mistake That Costs You $50 a Month in Spoiled Food
- How to Photograph Used Clothes to Sell Fast on Vinted or Depop?
- Why “Recyclable” Materials Are Not Always the Most Eco-Friendly Choice?
- How to Condition Leather Boots to Double Their Lifespan?
- Zero-Waste Practices for Beginners: How to Eliminate Single-Use Plastics in the Kitchen?
Why Recycling Should Be Your Last Resort, Not Your First?
For decades, we’ve been trained to think of the three R’s as “Reduce, Reuse, Recycle.” But in a true circular economy, this is a misleading oversimplification. Recycling is not a magic bullet; it’s a resource-intensive process that should only be considered when all other options for value preservation have been exhausted. It’s an ambulance at the bottom of the cliff, not a fence at the top. The goal is to avoid needing the ambulance in the first place, as a circular economy framework could cut global greenhouse gas emissions by up to 39%.
A more accurate and economically sound model is the “R-Strategies Hierarchy.” This framework prioritizes actions that retain the most value, energy, and labor embedded in a product. Recycling sits near the very bottom because it often involves shredding, melting, and remanufacturing, a process known as downcycling where material quality is lost. An aluminum can is a rare exception; most plastics can only be recycled into lower-grade products a few times before becoming unusable.
Thinking like an asset manager means prioritizing the higher R’s:
- Refuse & Rethink: The most powerful step. Do you need the item at all? Can you access its function through sharing or service models instead of ownership?
- Reduce: Use less. This is about efficiency—choosing products that require fewer resources to make and operate.
- Reuse & Repurpose: This is where value is truly preserved. Using a product again for its original function (Reuse) or a new one (Repurpose) keeps the material, form, and embedded energy intact.
Only after these higher-value options are impossible does Recycle become the “least bad” option before landfilling. Adopting this hierarchy fundamentally changes your purchasing and disposal habits from a linear “take-make-waste” model to a circular one of preservation and value retention.
How to Diagnose and Fix Small Appliances Before Buying New?
That silent toaster or sputtering coffee maker often triggers an immediate trip to the store. This “disposable” mindset is a significant financial drain and a prime example of resource depreciation. Before you replace a small appliance, adopting a simple diagnostic approach can often reveal a simple, low-cost fix, preserving the embedded value of the entire device. Major brands like Apple and Patagonia are already embracing this model, proving that refurbishment is an economically viable and sustainable strategy.
The diagnostic process doesn’t require an engineering degree. It starts with systematic, safe troubleshooting:
- Power Check (The Obvious First): Is it plugged in correctly? Try a different outlet. Check the cord for visible damage like frays or kinks. Many “broken” devices are simply not getting power.
- The “Reset” Button: Many modern appliances have an internal fuse or a reset button (often hidden at the base). Consult the user manual (easily found online with the model number) for its location and procedure.
- Identify the Point of Failure: Is it a mechanical or electrical issue? A jammed lever is mechanical. A device that’s completely dead is likely electrical. Listen for unusual noises or look for signs of overheating or blockage.
- Consult the Experts (For Free): Websites like iFixit offer thousands of free, step-by-step repair guides with photos. YouTube is another incredible resource; searching for “[Appliance Model] + [Problem]” (e.g., “Cuisinart DGB-900BC not grinding”) often yields a video tutorial.
This diagnostic mindset transforms a problem into a puzzle. Learning to perform a simple repair, like replacing a fuse or cleaning a clogged mechanism, not only saves you the cost of a new appliance but also builds valuable skills and confidence. It’s a direct investment in your household’s self-sufficiency and a powerful move against the throwaway culture.

As this image suggests, repair is a methodical process of investigation. With a few basic tools and a bit of patience, you can often extend the lifecycle ROI of your household goods significantly, keeping them in service and out of the landfill.
Compostable vs Biodegradable: Which Plastic Alternative Actually Breaks Down?
As consumers become more aware of plastic pollution, the market has been flooded with products labeled “biodegradable” or “compostable.” These terms sound eco-friendly, but they are often misleading and can cause more harm than good if misunderstood. The key difference lies in the specific conditions required for breakdown. “Biodegradable” is a vague term with no legal standard; technically, almost everything will biodegrade over hundreds of years. “Compostable,” however, implies that a material can break down into natural elements in a specific timeframe under controlled conditions.
The problem is that most “compostable” plastics, typically made from PLA (Polylactic Acid), require the high heat of an industrial composting facility (140°F+ or 60°C+) to break down. They will not decompose in a backyard compost bin, and if they end up in a landfill (which lacks oxygen), they can release methane, a potent greenhouse gas. Worse, if they are mistakenly placed in the recycling bin, they can contaminate an entire batch of conventional plastic, rendering it unrecyclable.
True innovation is moving towards materials that biodegrade in natural environments. Companies like Notpla are pioneering solutions using seaweed and plants to create packaging that is genuinely home-compostable or even edible. The following table clarifies the critical differences between these materials.
This comparative analysis, based on data from leading circular economy research, clarifies the specific conditions each material needs. As the Ellen MacArthur Foundation highlights, true circularity requires designing materials that fit within biological or technical cycles without causing harm.
| Material Type | Required Conditions | Breakdown Time | End Result |
|---|---|---|---|
| PLA (Polylactic Acid) | Industrial composting (140°F+) | 60-90 days | CO2, water, biomass |
| PHA (Polyhydroxyalkanoates) | Marine/soil environment | 3-6 months | Complete biodegradation |
| Traditional Plastic | None effective | 400+ years | Microplastics |
| Paper-based alternatives | Home compost | 2-6 weeks | Nutrient-rich compost |
As a consumer, the most practical choice is to prioritize reuse over single-use, regardless of the material. When single-use is unavoidable, favor paper or other certified home-compostable materials and be highly skeptical of generic “biodegradable” claims.
The Fridge Organization Mistake That Costs You $50 a Month in Spoiled Food
Food waste is one of the biggest, yet most invisible, expenses in a household budget. We throw away wilted greens, moldy leftovers, and forgotten fruit, effectively tossing cash into the compost bin. The common mistake is treating the refrigerator like a random storage closet. However, a refrigerator is a piece of technology with different zones designed for specific purposes. A science-based organization system can dramatically reduce spoilage and save a significant amount of money each month.
The key is to understand two factors: temperature variation and ethylene gas. The fridge door is the warmest part, while the back is the coldest. Ethylene is a natural gas emitted by some fruits (like apples and bananas) that accelerates ripening in nearby produce. Organizing your fridge with this in mind is a form of system-thinking for your kitchen.
Here is a simple, science-backed system to turn your fridge into a food preservation machine:
- Top Shelves & Door: These are the warmest zones. Use the door exclusively for condiments, juices, and water, which are less sensitive to temperature fluctuations. The top shelf is great for leftovers, drinks, and ready-to-eat foods.
- Middle & Bottom Shelves: These have the most consistent, cool temperatures. This is the ideal spot for eggs, dairy, and deli meats. Keep leftovers in clear, airtight containers here for maximum visibility.
- Crisper Drawers: These are the most misunderstood and powerful tools. Set one drawer to high humidity (by closing the vent) for leafy greens, herbs, and vegetables that wilt (e.g., carrots, broccoli). Set the second drawer to low humidity (open vent) for fruits that rot (e.g., apples, pears, grapes). This prevents ethylene gas buildup.
- The “Eat Me First” Box: This is the most critical innovation. Place a clearly labeled, open container at eye level on the top or middle shelf. In it, put any item that is nearing its expiration date or needs to be used up. This simple visual cue breaks the “out of sight, out of mind” cycle and ensures you use what you have.
This isn’t just about being tidy; it’s about active resource management. By implementing this system, you’re not just organizing food; you’re preserving the money and resources that went into growing, transporting, and buying it.
How to Photograph Used Clothes to Sell Fast on Vinted or Depop?
The rise of resale platforms like Vinted, Depop, and Poshmark has opened a powerful avenue for asset monetization in every household. Your closet isn’t just a collection of clothes; it’s an inventory of potential income. However, the difference between an item that sells in hours and one that languishes for months often comes down to one thing: photography. Buyers can’t touch or try on the item, so your photos must do all the work of conveying quality, fit, and style.
You don’t need a professional studio. You just need to follow the principles that online retailers use to make their products look desirable. It’s about creating a clean, honest, and appealing visual presentation that builds trust with the buyer. A few minutes of prep can significantly increase both the sale price and the speed of the sale.
Follow these steps to create compelling listings:
- Preparation is Key: Always steam or iron the item. Wrinkles scream “I don’t care,” which translates to low value. Clean any marks or scuffs. This small effort has a huge impact on perceived quality.
- Master Natural Light: The best light is free. Photograph your items during the day near a window, but out of direct, harsh sunlight. Soft, indirect natural light shows the true color and texture without creating ugly shadows. Never use a yellow-toned indoor lamp.
- Create a Consistent Background: A busy background is distracting. Use a neutral, solid backdrop like a plain white or light gray wall, a clean floor, or a simple sheet hung up. This makes your item the hero of the shot.
- Shoot a Complete Photo Set (5-7 Photos): A single photo is not enough. Buyers need to see everything. Your set should include: a full front shot, a full back shot, a close-up of the brand/size label, a close-up of the fabric texture or pattern, and at least one detail shot (e.g., unique buttons, a specific seam).
- Show the Fit (The “Styled Shot”): The most effective photo is often one showing the item being worn (if you’re comfortable) or styled on a mannequin. This helps buyers visualize how it will look on them, which is crucial for dresses, jackets, and pants.
- Be Honest About Flaws: If there’s a small stain, pull, or hole, photograph it up close with a coin next to it for scale. This transparency builds trust and prevents returns or bad reviews. Honesty sells.
By treating your used clothing like valuable inventory and presenting it professionally, you shift from simply decluttering to actively running a small-scale resale business from your home.
Why “Recyclable” Materials Are Not Always the Most Eco-Friendly Choice?
The “recyclable” symbol on a package offers a sense of comfort, but it obscures a complex and energy-intensive reality. A material’s ability to be recycled does not automatically make it the most environmentally friendly option. In many cases, it’s far from it. The fundamental reason is that recycling does not eliminate the need for energy and resources; it simply displaces them. The extraction and processing of natural resources to create these materials in the first place are incredibly impactful. In fact, The United Nations’ International Resource Panel concluded that natural resource extraction and processing contributes to over 50% of total global greenhouse gas emissions.
The core issue is material integrity. While materials like glass and aluminum can be recycled multiple times with little loss in quality, this is not the case for most others. Paper fibers get shorter and weaker with each cycle, and most plastics are downcycled into lower-quality products that are no longer recyclable. This means that even with a high recycling rate, there is a constant need for virgin materials to be fed into the system.
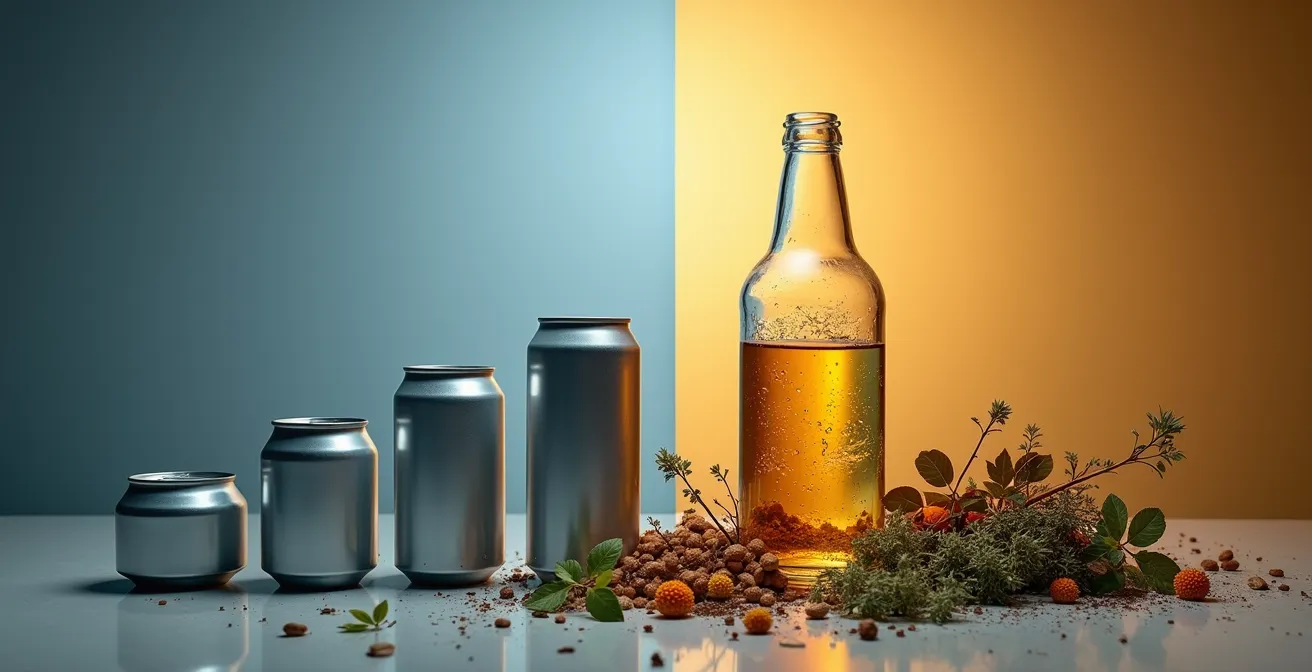
This visual contrast highlights the fundamental difference. The lifecycle of a single-use recyclable item is short and energy-intensive, ultimately leading to disposal. In contrast, a durable, reusable item like a glass bottle or stainless steel container preserves its form and function over hundreds or thousands of uses, dramatically lowering its overall environmental footprint per use. A reusable coffee cup used daily is vastly superior to a thousand recyclable paper cups, even if every one of them is recycled.
As Recycle Track Systems notes in their guide, the ideal system is one where the concept of waste is designed out from the beginning.
With circular economic activity, waste is reduced to a minimum because everything produced is transferred and used somewhere else, continuously.
– RTS – Recycle Track Systems, Circular Economy Guide
This forces a critical re-evaluation. The most eco-friendly choice is rarely the “recyclable” single-use item, but rather the durable, reusable alternative that bypasses the recycling system altogether.
How to Condition Leather Boots to Double Their Lifespan?
A pair of quality leather boots is a significant investment. With proper care, they are a prime example of an asset whose lifespan can be dramatically extended, maximizing their lifecycle ROI. Neglected leather dries out, cracks, and becomes vulnerable to water damage, leading to premature failure. Conditioning is not just cleaning; it’s a proactive maintenance process that replenishes the natural oils in the leather, keeping it supple, strong, and resilient.
The process is simple and requires only a few materials, but the key is consistency and using the right product for your leather type and needs. A monthly conditioning routine can easily double the functional life of your boots, saving you hundreds of dollars in replacement costs over the years.
Think of it as a scheduled tune-up for your footwear. Here’s a universal guide:
- Thorough Cleaning: Before applying any product, the leather must be clean. Remove laces. Use a horsehair brush to sweep away loose dirt and dust. Then, use a damp cloth to wipe down the entire boot. For stubborn salt or dirt stains, a specialized leather cleaner may be needed. Let the boots air dry completely away from direct heat.
- Product Selection: The type of conditioner matters. For very dry, cracked work boots, an oil-based conditioner (like mink oil) provides deep nourishment. For regular maintenance of dress or casual boots, a lighter cream-based conditioner is ideal. For maximum water resistance, a wax-based product provides a protective surface barrier.
- Application: Apply a small, dime-sized amount of conditioner onto a soft, clean cloth (an old t-shirt works perfectly). Work it into the leather in small, circular motions, paying special attention to seams and flex points where cracking is most likely to occur. Apply a thin, even coat—less is more.
- Absorption and Buffing: Let the boots sit for at least 20-30 minutes (or as directed by the product) to allow the conditioner to penetrate the leather’s pores. Then, take a clean horsehair brush and buff the entire boot with brisk, short strokes. This removes excess product and creates a soft, professional sheen.
- Proper Storage: How you store your boots is as important as how you treat them. Always store them in a cool, dry place away from sunlight. Inserting cedar shoe trees after each wear is the single best thing you can do. They absorb moisture, prevent odors, and, most importantly, help the boots retain their shape, preventing creasing and cracking.
This ritual transforms boot care from a chore into a practice of asset preservation. It’s a tangible way to honor the materials and craftsmanship of a quality product, ensuring it serves you well for years, not just a season.
Action Plan: Auditing Your Leather Boot Care Routine
- Points of Contact: List all your leather footwear (boots, shoes, etc.). Note their current condition (new, worn, dry, damaged).
- Collecte: Inventory your existing care products. Do you have a brush, clean cloths, and the right type of conditioner (oil, cream, wax)?
- Coherence: Confront your inventory with your boots’ needs. Are you using a heavy oil on fine dress shoes? Do you have a waterproofing wax for winter boots?
- Mémorabilité/Emotion: Identify the one pair of boots you value most. Commit to conditioning them this week to start the habit.
- Plan d’intégration: Purchase any missing supplies (e.g., cedar shoe trees, a horsehair brush). Schedule a recurring monthly “boot care” reminder in your calendar.
Key Takeaways
- The “R-Hierarchy” (Refuse, Reduce, Reuse, Repair) is a more effective economic and environmental model than focusing solely on recycling.
- Treating household items as assets to be maintained and monetized—not as disposable goods—is the core of a circular home economy.
- Small, systematic changes in habits, like fridge organization and proactive maintenance, have a significant cumulative impact on your finances and waste output.
Zero-Waste Practices for Beginners: How to Eliminate Single-Use Plastics in the Kitchen?
The kitchen is often the epicenter of single-use plastic in the home. From grocery bags and plastic wrap to disposable containers and paper towels, our quest for convenience has filled our drawers and trash cans with items designed to be used once and thrown away. Tackling this area offers the biggest and quickest wins for any family starting their zero-waste journey. The transition doesn’t have to be expensive or overwhelming; it’s about making sequential, smarter swaps over time.
The goal is not to achieve perfection overnight, but to follow a “good, better, best” progression. Start with an easy swap, and as that becomes a habit, move to the next level. This gradual approach makes the change sustainable. Beyond the environmental benefits, these practices foster a more intentional and economically savvy household, part of a wider transition that, in the EU alone, is projected to generate 700,000 new jobs by 2030 through circular practices.
Instead of trying to eliminate everything at once, focus on the “big four” culprits of kitchen waste and choose your starting point from the matrix below. This framework helps you identify durable, reusable alternatives that will save you money in the long run by eliminating repeat purchases.
This matrix, inspired by principles from organizations like the Ellen MacArthur Foundation, provides a clear roadmap for upgrading your kitchen tools from disposable to durable.
| Single-Use Item | Good Alternative | Better Alternative | Best Alternative |
|---|---|---|---|
| Plastic Bags | Paper bags | Reusable plastic bags | Canvas/cotton totes |
| Plastic Wrap | Aluminum foil | Silicone lids | Beeswax wraps |
| Disposable Containers | Recyclable containers | BPA-free plastic | Glass containers with lids |
| Paper Towels | Recycled paper towels | Microfiber cloths | Organic cotton towels |
Start with one row. If you use a lot of plastic wrap, invest in a set of beeswax wraps or silicone lids. Once you’ve mastered that, move on to replacing your disposable containers with glass ones. Each swap is a one-time investment that pays dividends for years, moving your kitchen from a linear model of consumption to a circular one of reuse.
By adopting these practical, economically-driven strategies, you can begin to transform your household’s output and finances. The next logical step is to systematically audit your own home to identify the biggest opportunities for savings and waste reduction.