In summary:
- Restoring original architectural details is not just an aesthetic choice; it’s a financial investment that significantly increases property value.
- Successful modernization prioritizes reversible, non-destructive interventions over irreversible changes like recessed lighting.
- Authenticity lies in understanding and respecting the original materials and construction methods, from paint finishes to plasterwork.
- The most valuable “DIY” task is historical research and documentation, which informs all other decisions and prevents costly mistakes.
- True value is created by preserving the home’s unique narrative, a priceless asset that goes beyond simple budget calculations.
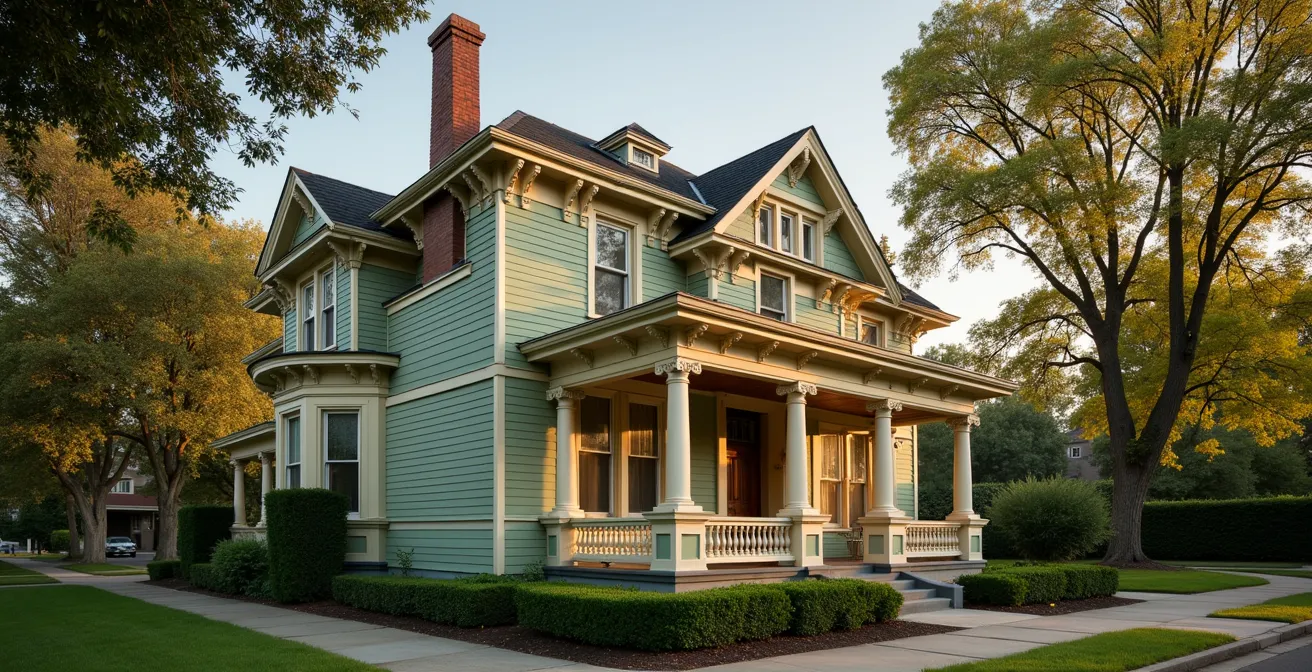
For the owner of a Victorian or pre-war home, renovation presents a unique paradox. You desire modern comfort and functionality, yet you are the custodian of a piece of history, rich with the irreplaceable character that drew you to it in the first place. The common approach often involves stripping away complexity for a clean, modern aesthetic, with many assuming that removing old trim or painting over everything is the path of least resistance. This often leads to a sterile environment where the home’s soul—its architectural narrative—is inadvertently erased.
But what if the most sophisticated approach to modernization isn’t about removal, but about thoughtful integration? The key to a successful historic renovation lies not in mimicking the past, but in adopting a preservationist mindset. This involves a deep respect for the home’s original architectural fabric, a commitment to technically sound, reversible interventions, and an appreciation for the story the house tells through its details. It’s about understanding the ‘why’ behind each element before deciding ‘how’ to proceed.
This guide moves beyond surface-level tips to provide an architect’s framework for making these critical decisions. We will explore how to analyze the value of original features, source authentic materials, sequence your project correctly, and determine which tasks require a professional’s touch. By mastering these principles, you can modernize your home in a way that enhances both its historic integrity and its long-term value.
To guide you through this process, this article is structured to address the most critical questions homeowners face when blending the old with the new. Explore the topics below to build a comprehensive restoration strategy.
Summary: A Framework for Restoring Your Historic Home’s Character
- Why Removing Original Crown Molding Devalues Your Historic Property?
- How to Source Plaster Moldings That Match Your 1920s Ceiling?
- Oil-Based vs Latex Paint: Which Finish Is Authentic for Period Trim?
- The Recessed Lighting Mistake That Ruins the Integrity of Vintage Ceilings
- When to Restore Floors: Before or After Painting the Walls?
- DIY vs Pro: Which Tasks Are Safe to Do Yourself to Save Money?
- The Framing Mistake That Ruins Paper Art Within 5 Years
- Successfully Renovating Residential Spaces: How to Increase Property Value by 15% on a Budget?
Why Removing Original Crown Molding Devalues Your Historic Property?
In the rush to simplify or modernize, original crown molding is often one of the first architectural elements to be removed. This is a profound mistake, both aesthetically and financially. Original moldings are not mere decoration; they are a fundamental part of the room’s architectural grammar. They were designed in proportion to the ceiling height and room size, creating a graceful transition between wall and ceiling that defines the space’s character. Removing them is akin to erasing the most expressive sentence from a page of literature.
The financial implications are just as significant. The real estate market for historic homes includes a discerning subset of buyers who actively seek and pay a premium for intact original details. The absence of these features is immediately noticeable and signals a loss of authenticity. According to a survey by Metrie, an overwhelming 97% of real estate experts agree that crown molding adds a significant increase to a home’s resale value. In a historic context, this value is amplified, as it represents preserved craftsmanship that is prohibitively expensive to replicate.
A living room upgrade that includes restoring or adding appropriate trim can yield a substantial return on investment. While a general upgrade can boost ROI, the “authenticity premium” is a distinct factor. As design expert Karen Gray-Plaisted notes, details like correctly proportioned molding add not just personality, but tangible value. Tearing out original plaster or wood molding destroys this inherent value, replacing a unique, high-quality feature with a void that is difficult and costly to fill authentically.
Ultimately, retaining original molding is one of the most effective, passive ways to protect your property’s value. It costs nothing to keep but costs a fortune in lost character and equity to remove.
How to Source Plaster Moldings That Match Your 1920s Ceiling?
When sections of original plaster molding are damaged or missing, the challenge is to find a replacement that seamlessly matches the existing profile. A generic, off-the-shelf molding from a big-box store will almost never work; its proportions will be wrong, the material will lack the sharp detail of plaster, and the result will look like a patch rather than a restoration. There are two primary professional avenues for sourcing authentic replacements: architectural salvage and custom replication.
Architectural salvage yards are treasure troves of historic building materials. These warehouses often have extensive collections of moldings, corbels, and medallions recovered from demolished or renovated period homes. The key to success here is meticulous documentation: take high-resolution photos of your existing molding, create a profile tracing on paper, and bring a small, intact fragment if possible. While finding an exact match can be time-consuming, the reward is a genuinely historic piece that brings its own story to your home.
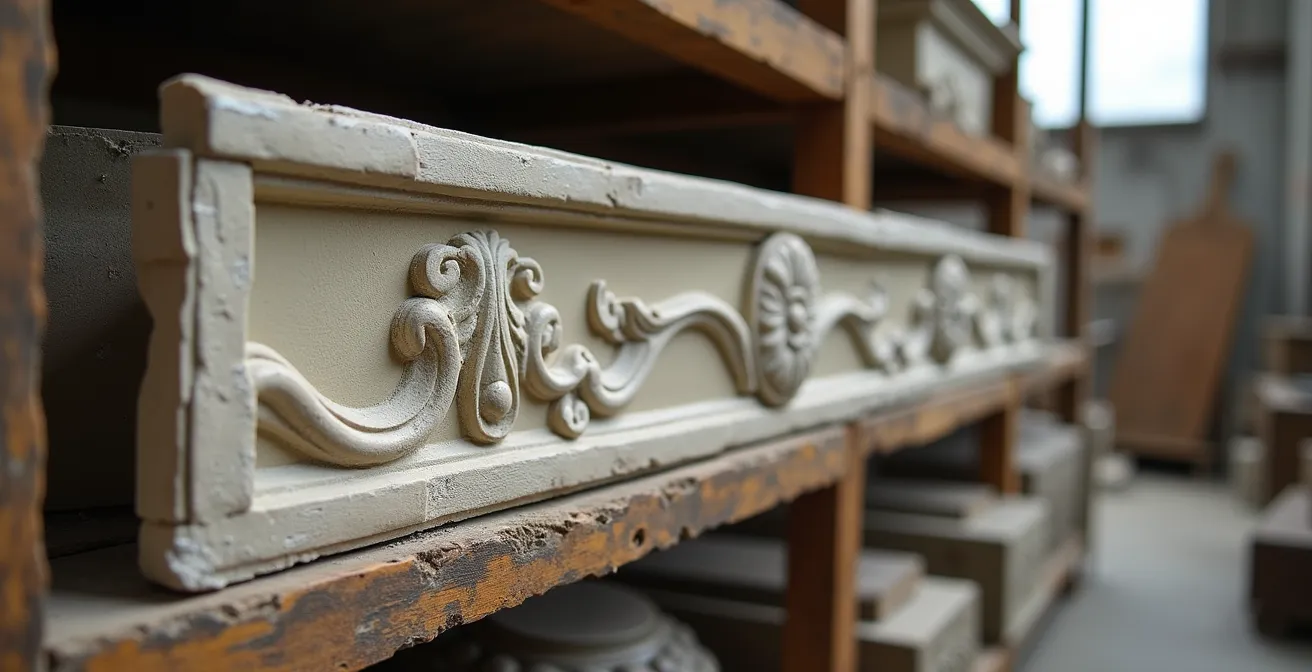
As you can see from the variety available, salvaged pieces offer an unparalleled level of authentic detail and patina. If a perfect match proves elusive, the second and more precise method is custom replication. This involves creating a new mold from an undamaged section of your existing molding. An expert can then cast new plaster pieces that are identical to the original. While more expensive, this guarantees a perfect match in scale, style, and material. This process ensures the structural integrity of the design is maintained, preserving the architect’s original intent.
For skilled DIYers, creating a silicone mold from an existing piece is a challenging but feasible project. It requires careful cleaning of the original, application of a release agent, and mixing silicone rubber to create a negative impression from which new plaster sections can be cast. This approach offers a high degree of control and a deeply rewarding outcome.
Oil-Based vs Latex Paint: Which Finish Is Authentic for Period Trim?
The choice of paint for historic trim is a subject of much debate, but from a preservationist’s perspective, the answer is rooted in material authenticity. Historically, trim in Victorian and pre-war homes was finished with oil-based (alkyd) paint. This was the dominant technology for centuries, and for good reason. Oil-based paints cure to a much harder, more durable finish than modern latex (acrylic) paints. This hardness gives the trim a distinctive, subtle luster and allows for crisper, sharper lines along detailed profiles.
The primary advantage of oil-based paint is its leveling property. As it dries, it flows out to create a smooth, glass-like surface that minimizes the appearance of brushstrokes. This is particularly important on ornate moldings, where the play of light and shadow across the details is a key part of the architectural effect. Latex paints, by contrast, tend to show more texture and can soften the sharp edges of intricate woodwork over successive coats, slowly obscuring the fine details that give historic trim its character.
However, the modern context presents challenges. Oil-based paints have higher levels of Volatile Organic Compounds (VOCs), longer curing times, and require mineral spirits for cleanup. This has led to their decline in availability and the rise of high-quality water-based acrylic-alkyd hybrids. These modern formulations attempt to replicate the hardness and flow of traditional oil paint with lower VOCs and easier cleanup. For many restoration projects, a high-end acrylic-alkyd enamel is a very respectable compromise, offering much of the performance of oil with greater convenience.
For a truly authentic restoration aiming for museum-quality results, a traditional oil-based paint remains the superior choice for its unmatched hardness and authentic sheen. For a practical renovation where durability and ease of use are priorities, a premium water-based enamel offers an excellent and responsible alternative that still respects the aesthetic integrity of the trim.
The Recessed Lighting Mistake That Ruins the Integrity of Vintage Ceilings
One of the most common and damaging modernization trends in historic homes is the installation of recessed can lights. While they offer a clean, modern look in new construction, they are fundamentally at odds with the character and construction of a vintage ceiling. The act of cutting multiple large holes into original plaster-and-lath is an act of irreversible destruction. It permanently damages the architectural fabric and structural integrity of the ceiling, a feature that has survived for, in many cases, over a century.
From a preservation standpoint, the core principle is reversibility. Any modification should be undoable without permanent harm to the original structure. Recessed lighting fails this test completely. Once the plaster, lath, and potentially even ceiling joists are cut, they cannot be truly restored. This is a significant concern for preservation-minded buyers, and it’s why 90% of preservation professionals recommend against such irreversible modifications. The damage goes beyond the physical; it disrupts the visual plane of the ceiling, which was designed as a solid, uninterrupted surface, often culminating in a central medallion for a chandelier.
Fortunately, achieving modern lighting levels without causing permanent damage is entirely possible. A layered lighting approach that respects the ceiling’s integrity is far more sophisticated and effective. Consider these zero-impact alternatives:
- Install high-end track lighting systems along existing crown molding where they are minimally obtrusive.
- Use picture rail lighting for adjustable, reversible illumination of artwork and walls.
- Add perimeter lighting or uplighting hidden within coving or mounted on walls to wash the ceiling with light.
- Embrace period-appropriate fixtures like chandeliers or pendants, mounted to existing or new ceiling medallions.
- Utilize “warm dim” LED technology in lamps and fixtures to replicate the warm glow of incandescent bulbs.
By using a combination of floor lamps, table lamps, and wall-mounted fixtures, you can create a rich, inviting atmosphere that is both functional and respectful of the home’s historic character. This approach preserves the very element you are trying to illuminate: the beautifully intact vintage ceiling.
When to Restore Floors: Before or After Painting the Walls?
Project sequencing is a critical aspect of any renovation, and in a historic home, the order of operations can mean the difference between a smooth project and a costly disaster. The question of whether to restore floors before or after painting is a classic dilemma, and the correct answer depends on the scope of the flooring work. The guiding principle is simple: the messiest work always comes first.
If you are undertaking a full restoration of original wood floors—which involves heavy sanding to remove old finishes and level the boards—this work must be done before final wall painting. A drum sander generates an enormous amount of fine dust that will permeate every corner of the room, clinging to walls and ceilings. Attempting to paint before this stage is a futile exercise; your fresh paint job would be ruined and require a thorough cleaning and repainting. The correct sequence is: structural repairs, paint stripping, heavy floor sanding, priming walls, one coat of finish paint, floor finishing (stain and polyurethane), and finally, the last coat of wall paint and trim installation.
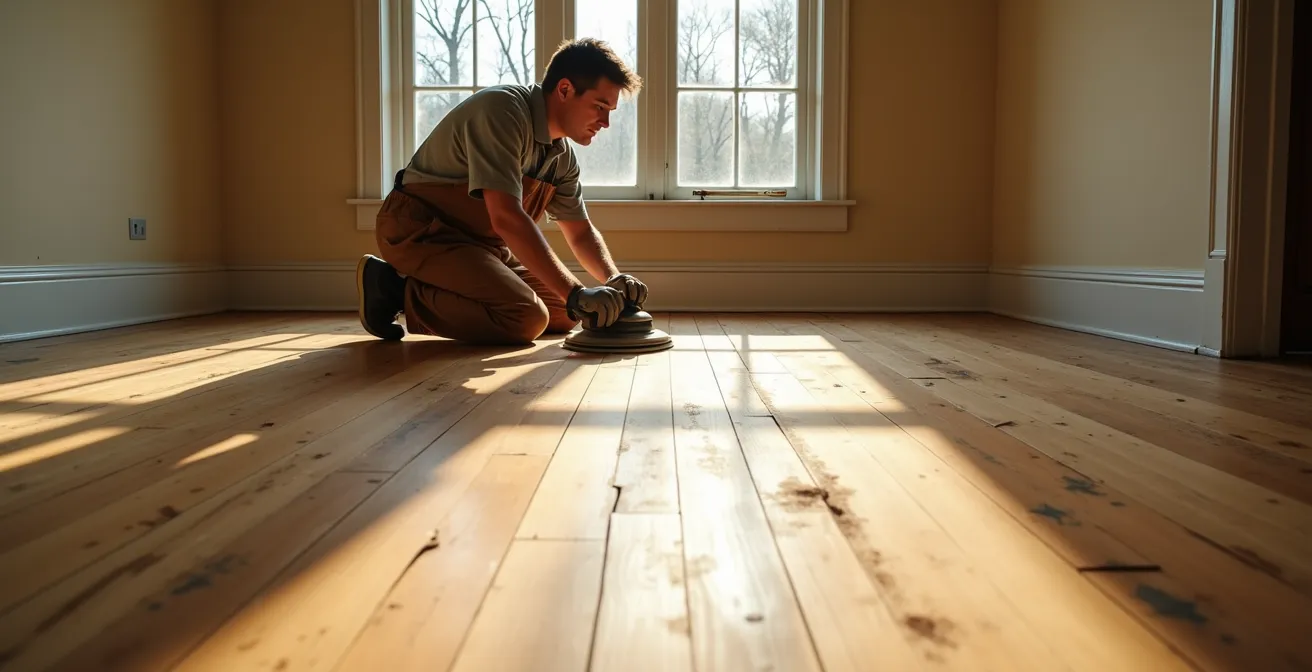
This careful sequencing ensures that dust-heavy tasks do not compromise finished surfaces. However, if your floors only require a light “screen-and-recoat” to refresh the existing finish, this can often be done after painting, provided the walls are fully cured and protected. A real-world example from the restoration of the 1893 Colonial Revival in Westford, MA, highlights this logic. According to the project details on PBS, the team first stripped lead paint from the central staircase. After that, heavy sanding was completed before any final wall paint was applied, emphasizing the dust-first rule. The project also stressed a crucial, often-overlooked step: allowing new or reclaimed wood flooring to acclimate inside the home for one to two weeks before installation to prevent buckling.
Ultimately, a successful renovation is a carefully choreographed dance of trades and tasks. By scheduling the dustiest, most disruptive work first, you protect finished surfaces and ensure a higher quality result.
DIY vs Pro: Which Tasks Are Safe to Do Yourself to Save Money?
In a historic renovation, the desire to save money by taking on tasks yourself is understandable. However, a miscalculation can lead to irreversible damage that costs far more to fix than hiring a professional from the outset. The decision to DIY should not be based on the perceived simplicity of a task, but on a clear-eyed assessment of risk, reversibility, and the specialized knowledge required. Not all tasks are created equal.
As one Historic Preservation Specialist from *7 Historical Trim Restoration Techniques for Old Homes* states, the path to savings is through knowledge, not just labor:
The best way to save money is to avoid mistakes by thoroughly understanding your home’s construction before any work begins. The single most valuable DIY task is historical research and documentation.
– Historic Preservation Specialist, 7 Historical Trim Restoration Techniques for Old Homes
This is the most crucial takeaway. Before you pick up a single tool, your time is best spent at the local historical society, in town archives, or searching for old photos of your home. Understanding its original layout, materials, and modifications is invaluable. Beyond research, safe DIY tasks are generally those with high reversibility and low structural risk. These include tasks like careful paint stripping (with proper safety gear for lead), cosmetic repairs, or documenting “ghost marks” on walls and floors that indicate where original features once stood.
Conversely, tasks that are irreversible, carry structural or health risks, or require deep material science knowledge should be left to professionals. This includes any structural demolition, window restoration, complex plasterwork (especially with lime plaster), and, most critically, lead paint abatement, which legally requires certification in many areas. The following framework provides a model for assessing which tasks to consider.
This table, based on an assessment in a recent analysis of restoration techniques, helps homeowners evaluate tasks based on risk rather than just cost.
| Task Category | Reversibility | Structural Risk | Material Knowledge Required | Tool Investment | Recommendation |
|---|---|---|---|---|---|
| Historical Research | N/A | None | Basic | Minimal | DIY – Most valuable task |
| Paint Stripping | High | Low | Moderate | $100-300 | DIY with proper safety gear |
| Plaster Repair | Medium | Low | High (lime vs gypsum) | $200-500 | Pro-Assisted DIY model |
| Structural Demolition | Low | Very High | Expert | $500+ | Professional Only |
| Lead Paint Removal | N/A | Health Risk | Certification Required | Specialized | Professional Only |
Ultimately, the smartest way to save money in a historic renovation is to invest your own time in research and project management, while entrusting high-risk, specialized tasks to qualified professionals who will get it right the first time.
The Framing Mistake That Ruins Paper Art Within 5 Years
After investing so much effort into the architectural integrity of your home, it’s crucial to apply the same preservationist mindset to the objects within it. A common and heartbreaking mistake is displaying art, photographs, or historic documents in standard, off-the-shelf frames. The acidic materials and lack of UV protection in these products can cause irreversible damage—fading, yellowing, and embrittlement—in as little as five years, especially in historic homes with original single-pane windows.
Original windows are a cherished feature, but they are notoriously poor at blocking ultraviolet (UV) radiation. Preservation experts note that they can transmit up to 75% of UV radiation, the primary culprit behind fading colors and paper degradation. Simply keeping art out of direct sunlight is not enough; the ambient UV light in a room is sufficient to cause significant damage over time. The solution is not to replace your historic windows, but to use the frame itself as a micro-environment that protects the artwork.
This is achieved through archival framing, also known as conservation framing. It involves using a specific set of materials and techniques designed for long-term preservation. The difference between a standard frame and an archival one is not visible to the naked eye but is critical to the longevity of your art. Every component, from the mat board to the glazing, must be chosen with preservation in mind. Ignoring these principles is a false economy that risks the total loss of valuable or sentimental items.
Action Plan: Your Checklist for Archival Framing
- Use only acid-free ‘rag’ mat boards made from 100% cotton or linen; avoid standard paper-pulp boards.
- Select archival backing boards with a neutral pH to prevent acid migration into the artwork.
- Install UV-protective glass or acrylic, which can block up to 99% of harmful UV rays. This is non-negotiable.
- Maintain proper spacing between the art and the glass using spacers or a mat to prevent mold growth.
- Use reversible mounting techniques like photo corners or Japanese paper hinges with wheat-starch paste; never use adhesive tapes.
By investing in proper archival framing, you are creating a safe harbor for your art, protecting it from the environment without compromising the historic character of your home’s beautiful, light-filled spaces.
Key Takeaways
- Preserve, Don’t Replace: The most budget-friendly and value-enhancing decision is almost always to repair and retain original features. The cost of recreating lost character is far greater than the cost of restoration.
- Prioritize Reversibility: When modernizing, ensure all interventions (especially lighting and mechanicals) are reversible and do not cause permanent damage to the home’s original architectural fabric.
- Value the Narrative: The story of your house—told through its unique details, craftsmanship, and documented history—is a priceless asset. Documenting your restoration process in a “House Manual” adds immense narrative and financial value.
Successfully Renovating Residential Spaces: How to Increase Property Value by 15% on a Budget?
When renovating a historic home, the concept of a “budget” must be reframed. The most impactful financial decisions are not about choosing the cheapest materials, but about avoiding the colossal expense of making mistakes. As one preservation specialist eloquently stated, “In a historic context, the most ‘budget-friendly’ decision is often to repair and retain rather than replace.” The true path to increasing property value lies in enhancing the home’s unique, authentic character, not in erasing it with generic updates.
The conventional wisdom of chasing a 15% ROI through kitchen and bath remodels can be misleading in a historic context. While important, the greatest value is often unlocked by preserving the very elements that define the home’s era. This includes restoring original woodwork, repairing plaster walls instead of covering them with drywall, and reglazing original windows rather than replacing them with vinyl. These actions preserve the narrative value of the property, a quality that commands a significant premium among discerning buyers.
A powerful, low-cost strategy to crystallize this narrative value is the creation of a comprehensive “House Manual.” One restoration project for a 1910 Victorian, documented by the Old House Guy, demonstrated this perfectly. The owner went beyond the physical work to create a binder documenting the entire process. It included before-and-after photos, historical research, notes from conversations with previous residents, and a complete list of materials and suppliers used. A key success was using “ghost marks” and oral history to recreate the home’s original pantry configuration. This manual transformed the house from a simple property into a curated piece of history, becoming a priceless asset at resale.
By shifting your focus from short-term costs to long-term value preservation, you can achieve a return far greater than 15%. Your renovation becomes not an expense, but an investment in the enduring story and character of your home. To begin applying these principles, the next logical step is to start your own historical research and create a “House Manual” to document your home’s unique story and your thoughtful restoration journey.